


How to Lube Mechanical Switches
HOW-TO
Change Modular Gaskets
Overview
The GMMK 3 features our innovative Modular Gasket System (MGS), allowing you to effortlessly tailor your typing experience.
With the MGS, you can easily swap out modular gaskets that support the GMMK 3’s PCB & Switch Plate (PCBA), letting you customize the firmness or flexibility of your typing.
Forget messy adhesives — our MGS employs a straightforward post-and-peg design reminiscent of popular building blocks, making adjustments intuitive and repeatable for users of all skill levels.
What's in the Box?
If you’ve ordered a GMMK 3 Gasket Module Pack in either the Flex or Firm variant, you should receive:
- 14 × Modular Gaskets
Tools Needed
- 1 × Screwdriver (Philips #00 if you did not keep the screwdriver included in your GMMK 3’s box)
Modular Gasket System (MGS)
Accessing the MGS
- Make sure the keyboard is unplugged and wireless keyboards are powered off before proceeding.
- Flip the keyboard over to access its underside, ideally resting it on a softer surface like a large mousepad.
- Use your fingernail or a plastic pry tool to remove the keyboard's rubber feet inserts. The amount will vary depending on the size and case material.
a. Metal 65% & 75%: 4 Feet Positions
b. All Plastic & 100% Metal: 8 Feet Positions - Using your screwdriver, remove the keyboard's case screws located directly beneath its rubber feet positions, and place them aside.
a. Metal 65% & 75%: 4 Case Screws
b. All Plastic & 100% Metal: 8 Case Screws - Bracing both the keyboard's top and bottom cases, carefully flip the keyboard back over.
- Lift the keyboard's top case up and away before setting to the side.
- Grab the keyboard's PCBA (Plate & PCB assembly) with one hand, and slowly lift up just enough to access the cable connecting the PCB and the USB-C daughterboard.
- Use your other hand to grab the cable connected to the keyboard's PCB near the connection point, and carefully, but firmly, unplug it. Set the PCBA aside.
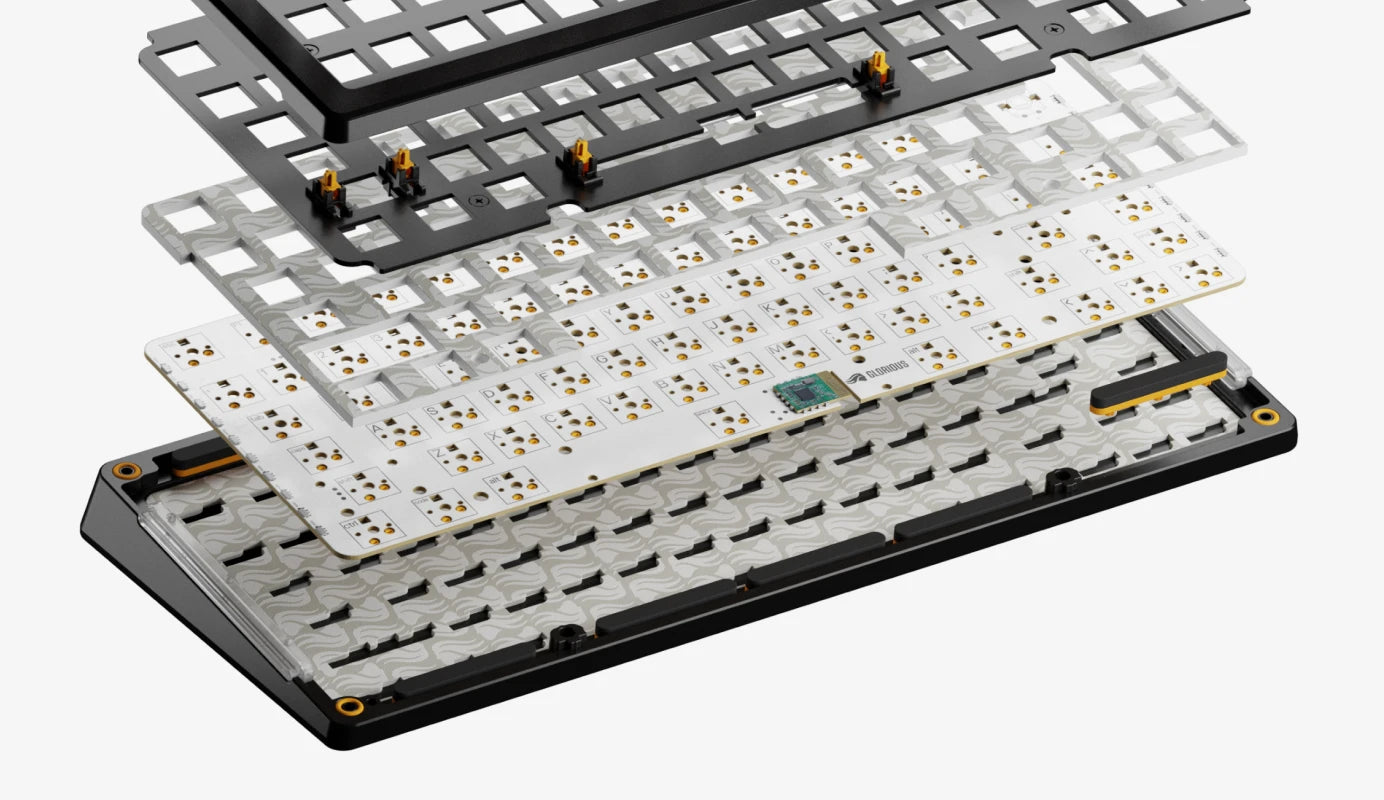
- You can now freely access the GMMK 3’s Modular Gasket System, noting the pre-installed gasket modules lining the bottom of the case.
Adjusting Gasket Modules
- Remove gasket modules by gently pulling out the module from the bottom case. See below for tips on how best to arrange gasket modules for a more flexible typing experience.
- Install gasket modules by lining up the posts with the corresponding holes in the GMMK 3’s bottom case before pressing them into place.
Closing Up Your Keyboard
- Once your gasket modules are arranged to your liking, carefully plug the daughterboard cable into the back of the PCB.
- Set the PCBA back into the bottom case while pushing the cable’s length into the recessed channel until flush with the bottom case.
- Ensure proper alignment before then placing the top case back on.
- Keeping the top and bottom cases pressed together, carefully flip the keyboard back over to access the case screw positions.
a. Tip: Struggling to keep everything in place while screwing the cases together? Try setting your keyboard upright, perpendicular to your desk. - Screw the top and bottom cases back together, starting with the corners before moving inward. At the start, use your hand to gently press the cases together to make the process easier.
- Congratulations!
Tips & Tricks
More Flexible Typing Experience
For a more flexible typing experience, which may feel more comfortable for heavy typists or during extended gaming and productivity sessions:
- If your GMMK 3 has Firm (Blue) gasket modules pre-installed, try replacing them with Flex (Glorange) gasket modules which use soft PORON foam.
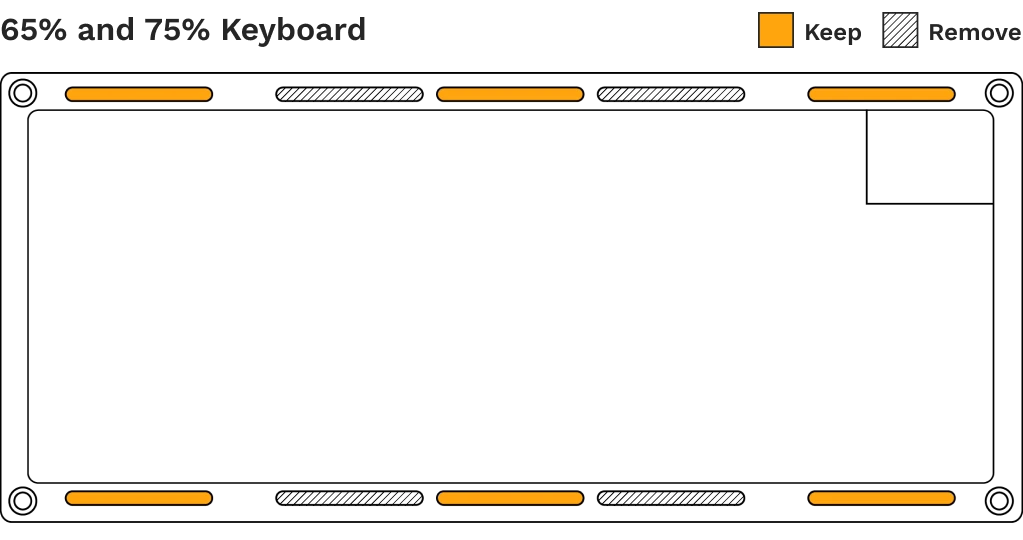
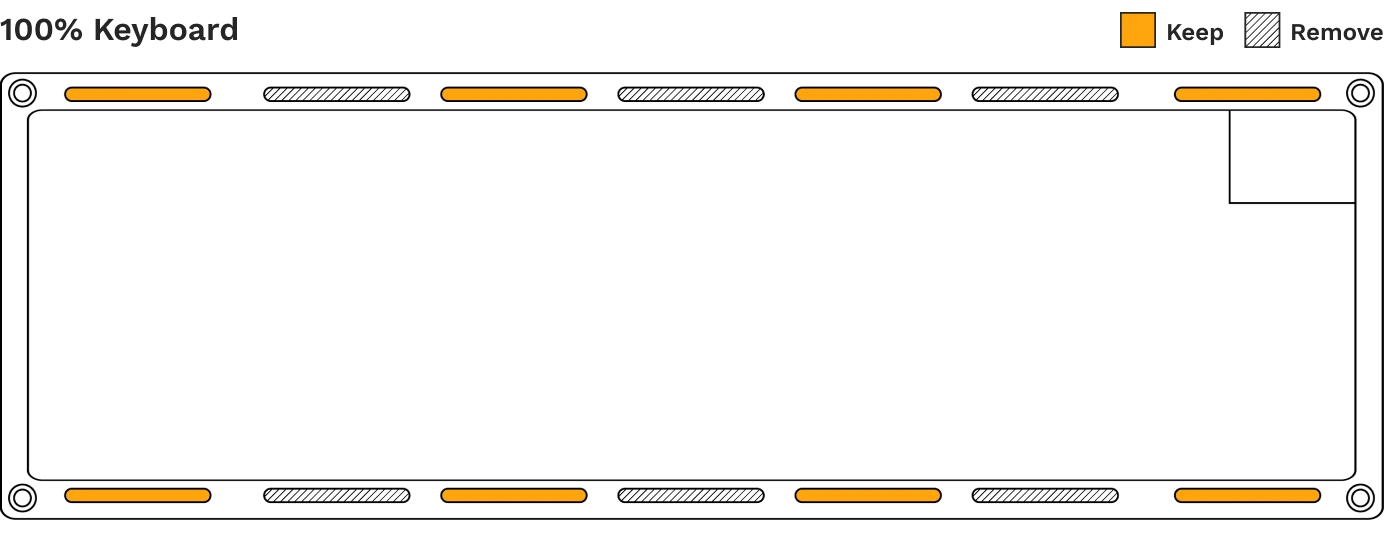
- Removing gasket modules reduces support for the GMMK 3’s PCBA, enhancing its mobility for a more flexible typing experience. Use the diagrams below to reference which positions we recommend keeping and removing depending on your keyboard’s size.
Firmer Typing Experience
For a firmer typing experience, which offers a more precise and consistent feel ideal for competitive gameplay and fast typing:
- If your GMMK 3 has Flex (Glorange) gasket modules pre-installed, try replacing them with Firm (Blue) gasket modules made entirely of hard silicone.
- Make sure all gasket modules are installed to ensure the PCBA has the most support possible.
- If your GMMK 3 has a more flexible switch plate pre-installed, like Polycarbonate or FR4, replace it with a firmer material like Brass or Aluminum.
- Using the GMMK 3 on a rigid surface, like a hardwood tabletop, can also make keystrokes feel firmer compared to using it on a large mousepad.
Additional LInks
Support
Questions or concerns regarding your GMMK 3 or separately purchased GMMK 3 Gasket Module Pack can be directed to our support team.
Note that Glorious is unable to offer comprehensive support for parts (switches, stabilizers, modding tools, etc.) purchased from other companies.
Warranty
Important Notices
- 1 year limited manufacturer warranty for GMMK 3 Gasket Module Packs.
- Small objects could be swallowed.
- Keep out of reach of children below the age of 10.