

PRODUCT GUIDE
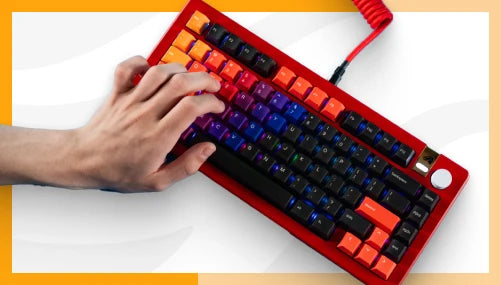
GMMK 3 PRO - 65%, 75%, & Full Size (100%)
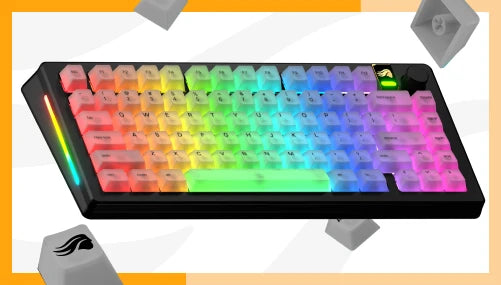
The World’s Most Customizable Gaming Keyboard, offering gamers complete control over every aspect of their experience: gaming performance, typing experience and aesthetics.
What's in the Box for Wired & Wireless
Wired
- 1 x GMMK 3 PRO (or GMMK 3 PRO Barebones)
- 1 x Braided Cable
- 3 x Sample Switches
- 6 x Extra Screws and O-Rings
- 1 x Switch Puller
- 1 x Keycap Puller
- 1 x Screwdriver
- 1 x Quick Start Booklet
Prebuilt Only - 4 x macOS Alternate Keycaps
Wireless
- 1 x GMMK 3 PRO Wireless (or GMMK 3 PRO Wireless Barebones)
- 1 x 2.4 GHz Wireless Receiver
- 1 x Braided Charging Cable
- 3 x Sample Switches
- 6 x Extra Screws and O-Rings
- 1 x Switch Puller
- 1 x Keycap Puller
- 1 x Screwdriver
- 1 x Quick Start Booklet
Prebuilt Only - 4 x macOS Alternate Keycaps
Note: Barebones keyboards do not include a full set of switches or keycaps.
Getting Started
Plug & Play
First, connect the USB-C end of the included cable to your keyboard. Then, plug the USB-A end into an open port on your computer. Your system will automatically recognize the device and install the necessary drivers for basic operation (Windows Only).
System Requirements
- Available USB-A port
- Windows 10+, macOS 10.11 or later
- [Optional] Bluetooth Compatibility (Wireless Only)
Glorious CORE 2.1 Software
Download Glorious CORE 2.1 now to ensure your GMMK 3 is running the latest firmware for peak performance. With CORE 2.1, you can access advanced lighting effects, save personalized keyboard profiles, create custom macros, and set keybinds for total control. Follow the instructions at the link below to get started.
How To Connect Wirelessly (Wireless Only)
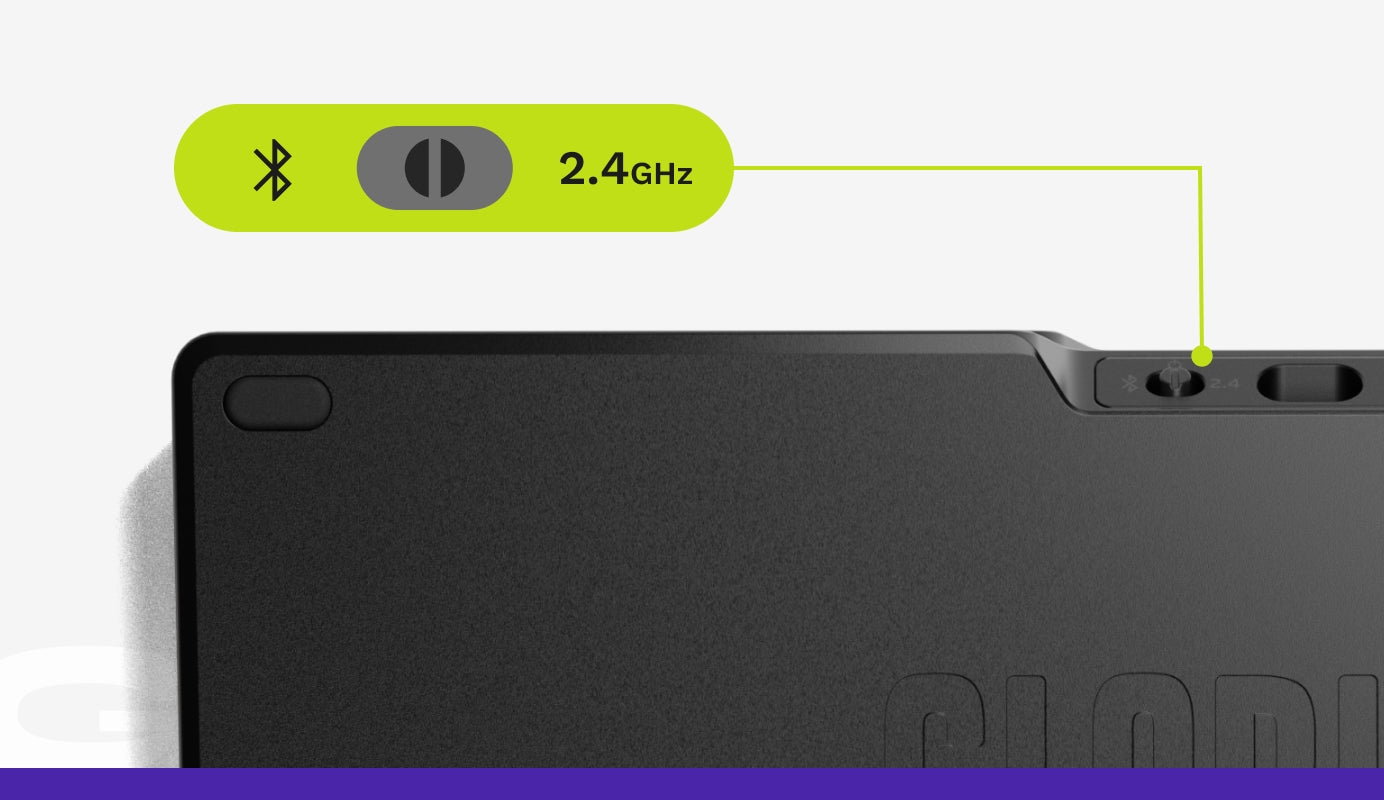
To Connect via 2.4GHz Wireless
- Ensure your device is powered on and the connection toggle switch, near the charging port, is set to “2.4.”
- Plug the included 2.4GHz USB-A wireless receiver into an open port on your device.
To Enter Bluetooth Pairing Mode
- Ensure your device is powered on and the connection toggle switch, near the charging port, is set to “BT.”
- Press the following button combo to send your device into Bluetooth pairing mode, indicated by a flashing blue badge.
- 65%: FN + K
- 75%: FN + ‘
- Full Size (100%): FN + ‘
- Go to Bluetooth settings on your compatible device to find and pair your GMMK 3.
For more in-depth pairing instructions, please refer to the Wireless Connection How-to Guide linked below on pairing multiple devices, disconnecting from devices, and more.
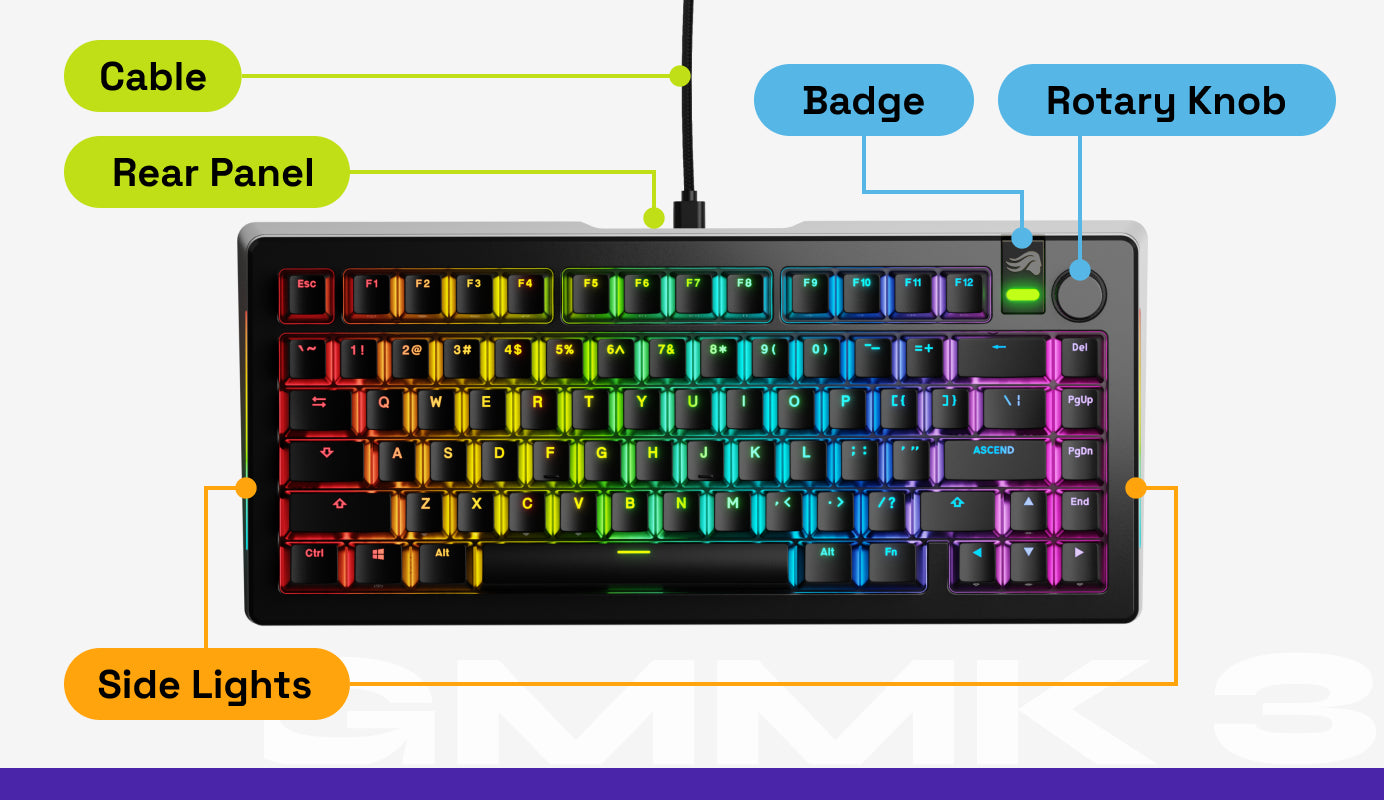
Using the Rotary Knob
- Rotating the knob clockwise raises your device’s volume.
- Rotating counterclockwise lowers volume.
- Pressing the knob once toggles between muting and unmuting your device’s sound.
- Double-tapping the knob cycles through the keyboard’s 3 customizable layers.
Customizing Functions: The knob’s functions and keyboard’s layers are customizable via Glorious CORE 2.1.
Switching Between Windows & MacOS Functions
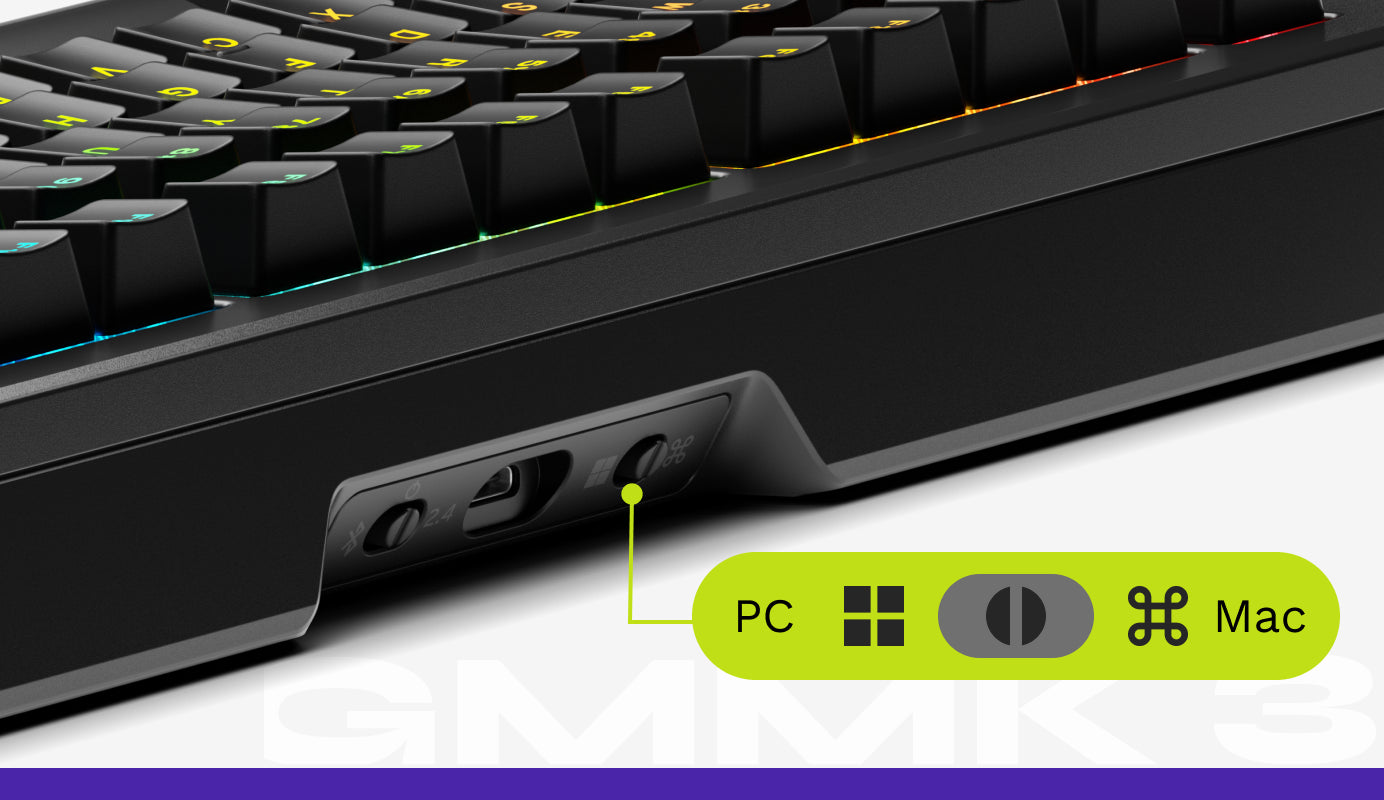
- On the backside of the GMMK 3 PRO near the USB port is an Operating System Toggle Switch that lets you instantly change the keyboard’s bottom row functions to match either Windows or macOS.
- For Windows (Default): Flip the switch to the left, and the device will use the bottom row inputs that match the standard Windows layout.
- For macOS: Flip the switch to the right, and the device will use the bottom row inputs that match the standard macOS layout.
Switching Between Keyboard Profiles (Wired Only)
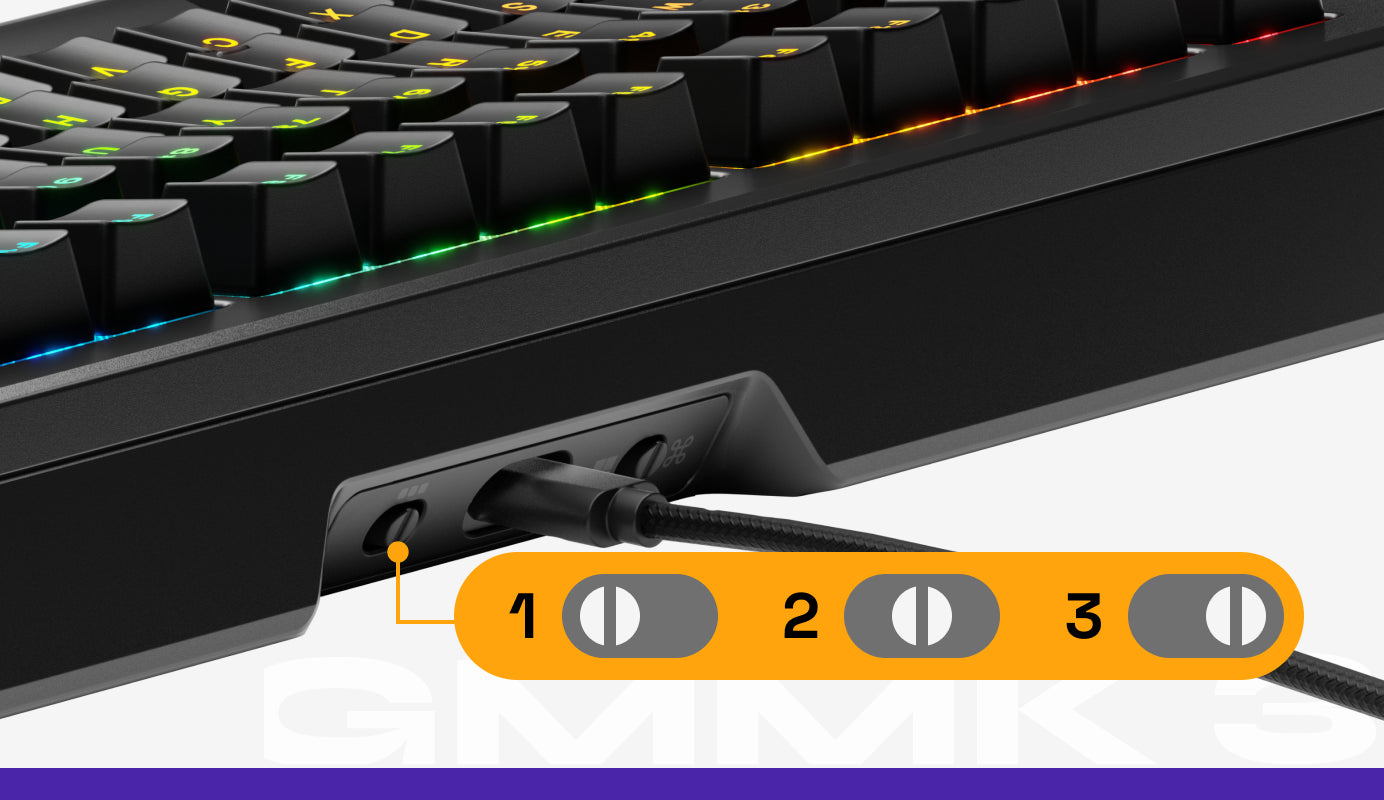
- 3 custom profiles can be saved to the GMMK 3 PRO. On the backside of the board, near the USB port, is a Profile Switch with three positions. Each corresponds to the respective profile they activate.
- For Profile 1 (Default): Flip the switch to the far left position.
- For Profile 2: Flip the switch to the middle position.
- For Profile 3: Flip the switch to the far right position.
- Customizing Profiles: Profiles can be customized via Glorious CORE 2.1.
Useful Key Combinations
65%
Lighting Control
Cycle through active RGB zone
FN + Z
Cycle through colors for current effect (if applicable)
FN + X
Cycle lighting effect speed (If applicable)
Decrease
FN + C
Increase
FN + V
Cycle Lighting Effect
Previous
FN + Left
Next
FN + Right
Cycle Brightness
Decrease
FN + Up
Increase
FN + Down
Cycle through active RGB zone
FN + Z
Cycle through colors for current effect (if applicable)
FN + X
Cycle lighting effect speed (If applicable)
Decrease
FN + C
Increase
FN + V
Cycle Lighting Effect
Previous
FN + Left
Next
FN + Right
Cycle Brightness
Decrease
FN + Up
Increase
FN + Down
Media Control (Windows Only)
Mute
FN + B
Previous Track
FN + ,
Volume Down
FN + N
Play/Pause
FN + .
Volume Up
FN + M
Next Track
FN + /
Mute
FN + B
Previous Track
FN + ,
Volume Down
FN + N
Play/Pause
FN + .
Volume Up
FN + M
Next Track
FN + /
System Control
Scroll Lock (Windows Only)
FN + U
Printscreen
FN + P
Enable/Disable Windows Key
FN + Win
End
FN + Page Up
Del
FN + Backspace
Home
FN + PageDown
Insert
FN + O
Scroll Lock (Windows Only)
FN + U
Printscreen
FN + P
Enable/Disable Windows Key
FN + Win
End
FN + Page Up
Del
FN + Backspace
Home
FN + PageDown
Insert
FN + O
Special Functions
~
FN + Shift + Esc
`
FN + Esc
Cycle Layers Up
FN + Alt + Up
Cycle Profiles Up
FN + Alt + Left
Cycle Layers Down
FN + Alt + Down
Cycle Profiles Down
FN + Alt + Right
~
FN + Shift + Esc
`
FN + Esc
Cycle Layers Up
FN + Alt + Up
Cycle Profiles Up
FN + Alt + Left
Cycle Layers Down
FN + Alt + Down
Cycle Profiles Down
FN + Alt + Right
Permanent Combination
Restore Keyboard to Factory Default Settings
FN + ESC then F1 + F3 + F5 (Hold for 10 Seconds)
Restore Keyboard to Factory Default Settings
FN + ESC then F1 + F3 + F5 (Hold for 10 Seconds)
75% & 100%
Lighting Control
Cycle through active RGB zone
FN + Z
Cycle through colors for current effect (if applicable)
FN + X
Cycle lighting effect speed (If applicable)
Decrease
FN + C
Increase
FN + V
Cycle Lighting Effect
Previous
FN + Left
Next
FN + Right
Cycle Brightness
Decrease
FN + Up
Increase
FN + Down
Cycle through active RGB zone
FN + Z
Cycle through colors for current effect (if applicable)
FN + X
Cycle lighting effect speed (If applicable)
Decrease
FN + C
Increase
FN + V
Cycle Lighting Effect
Previous
FN + Left
Next
FN + Right
Cycle Brightness
Decrease
FN + Up
Increase
FN + Down
Media Control (Windows Only)
Media Player
FN + F4
Stop
FN + F8
Previous Track
FN + F5
Mute
FN + F9
Next Track
FN + F6
Volume Down
FN + F10
Play/Pause
FN + F7
Volume Up
FN + F11
Media Player
FN + F4
Stop
FN + F8
Previous Track
FN + F5
Mute
FN + F9
Next Track
FN + F6
Volume Down
FN + F10
Play/Pause
FN + F7
Volume Up
FN + F11
System Control
Enable/Disable Windows Key
FN + Win
Web Browser
FN + F2
Home
FN + End
Calculator
FN + F3
My Computer
FN + F1
Print Screen
FN + F12
Enable/Disable Windows Key
FN + Win
Web Browser
FN + F2
Home
FN + End
Calculator
FN + F3
My Computer
FN + F1
Print Screen
FN + F12
Default Layer 3 Combinations
Cycle Layers Up
FN + Alt + Up
Cycle Profiles Up
FN + Alt + Left
Cycle Layers Down
FN + Alt + Down
Cycle Profiles Down
FN + Alt + Right
Cycle Layers Up
FN + Alt + Up
Cycle Profiles Up
FN + Alt + Left
Cycle Layers Down
FN + Alt + Down
Cycle Profiles Down
FN + Alt + Right
Permanent Combination
Restore Keyboard to Factory Default Settings
FN + ESC then F1 + F3 + F5
(Hold for 10 Seconds)
Restore Keyboard to Factory Default Settings
FN + ESC then F1 + F3 + F5
(Hold for 10 Seconds)
How-To Build Guilds
Click a how-to guide below for step-by-step instructions on how to customize your GMMK 3 PRO's look, sound, and feel to your exact preference.
Technical Specifications
Wired
Layout:
65%: 65 Keys, 75%: 80 Keys, 100%: 104 Keys
Switch Compatibility:
3 or 5-pin Mechanical (MX)
Connectivity:
USB-C Wired (Detachable)
RGB Lighting:
Per-key ; Sidelights ; Badge
OS Support:
Windows 10+ ; macOS 10.11 or later
Software:
Glorious CORE
Max Polling Rate:
1,000 Hz
Dimensions:
65%: 13.2” x 4.9” x 1.7” (335 mm x 125 mm x 42.5 mm)
75%: 13.3” x 6” x 1.8” (338 mm x 152 mm x 44.5 mm)
100%: 18.2” x 6” x 1.8” (462 mm x 152 mm x 44.5 mm)
Weight:
65%: 3.20 lb (1.45 kg)
75%: 3.97 lb (1.80 kg)
100%: 5.53 lb (2.51 kg)
Wireless
Layout:
65%: 65 Keys, 75%: 80 Keys, 100%: 104 Keys
Switch Compatibility:
3 or 5-pin Mechanical (MX)
Connectivity:
2.4GHz Wireless ; Bluetooth ; Wired
RGB Lighting:
Per-key ; Sidelights ; Badge
OS Support:
Windows 10+ ; macOS 10.11 or later
Software:
Glorious CORE
Max Polling Rate:
1,000 Hz (Wired)
Dimensions:
65%: 13.2” x 4.9” x 1.7” (335 mm x 125 mm x 42.5 mm)
75%: 13.3” x 6” x 1.8” (338 mm x 152 mm x 44.5 mm)
100%: 18.2” x 6” x 1.8” (462 mm x 152 mm x 44.5 mm)
Weight:
65%: 3.28 lb (1.49 kg)
75%: 4.10 lb (1.86 kg)
100%: 5.67 lb (2.57 kg)
Battery Life:
65%: 2.4: 28 hrs ; Bluetooth: 26 hrs
75%: 2.4: 24 hrs ; Bluetooth: 21 hrs
100%: 2.4: 22 hrs ; Bluetooth: 19 hrs
Warranty
2 Years
Support
Questions or concerns regarding your Glorious keyboard can be directed to our support team.
Note that Glorious is unable to offer comprehensive support for third party firmware or parts (switches, keycaps, stabilizers, etc.) purchased from other companies.
Important Notices
- 2-year limited manufacturer warranty
- Warranty does not cover damages resulting from opening the keyboard.
- Keycaps and other small objects could be swallowed.
- Keep out of reach of children below the age of 10.
Product Registration
Registering your product extends the warranty by an additional year (free of charge) on eligible devices. To be eligible, register your device within 365 days of the date of purchase.
Multi Language Quick Start Guide
Looking for the quick start guide for this product in multiple languages? Click the links below to download.
Included languages: English, French, German, Italian, Spanish, Chinese, Japanese, Polish, Arabic
Wired Guide
Wireless Guide